Arjun Archery Academy - Archery Training Guide and Framework
Arjun Archery Academy
Archery Training Guide Framework
For Aspiring Compound & Recurve Archers
Written by Rhythm R
Contributors: Ajay R, Sid P, Nirek S, Sahith M, and Aarush G
TABLE OF CONTENTS
Introduction
Anatomy of the Bow
Form Fundamentals
Equipment and Tuning Basics
Mental Game & Practice Habits
Weekly Sample Training Plan
How to Compete
Conclusion
01. Introduction
The goal of this training guide framework is to provide a simple, focused resource that covers form, mindset, training habits, and gear basics across both competitive divisions, compound and recurve, that we offer here at Arjun Archery Academy.
After seven years of competition and coaching national-level medalists, I kept seeing the same problems: archers with decent form but no systematic approach to improvement, and beginners overwhelmed by scattered advice online. This guide consolidates everything you need to know to level up your competitive game in terms of archery.
This year alone, 15 archers from Arjun Archery Academy qualified for nationals, with 10 bringing home medals, a testament to the systematic approach outlined in this guide.
Because there are two main styles of archery taught at Arjun Archery Academy, I will address both in their own respects, and consult coaches and high level archers on what they think would be a beneficial addition.
This guide will assume that you have an understanding of the different parts and kinds of bows, but even if you do not, this is still worth reading. I hope by reading this, you gain a more informed understanding of the sport of archery as a whole, and I guarantee you will get something out of it.

02. Anatomy of the Bow
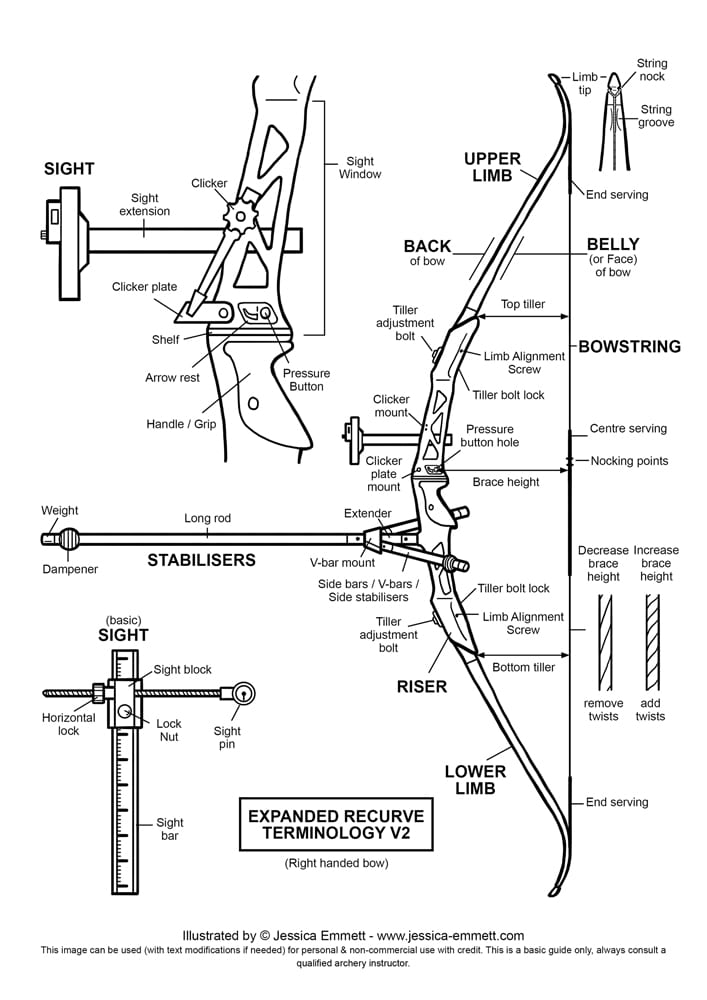
Before you can truly master the art of archery, you need to understand the tool in your hands. Whether you shoot compound or recurve, every part of the bow serves a specific purpose that directly impacts your performance. From the limbs that store energy to the string that launches your arrow, each component plays a critical role in your shot execution, consistency, and comfort.

Figure 3: An advanced diagram delving into the anatomy of a recurve bow.
Source: Jessica Emmett
Retrieved from: https://www.jessica-emmett.com/wp-content/gallery/archery-diagrams/recurve-extended-terminology-diagram-web.jpg

Figure 4: An advanced diagram delving into the anatomy of a compound bow
Source: Lancaster Archery Supply
These diagrams serve as a general reference for understanding the parts referenced throughout this guide.
03. Form Fundamentals
In archery, there is a shot process that we are all taught to learn. What the shot process doesn’t delve into however, is how the steps should be executed for proper form and technique.

Figure 5: The national training system steps of shooting
Source: Pioneer Joad
Retrieved from: https://www.pioneerjoad.org/what-is-nts
Each one of these steps are very important to learning archery, as it gives structure to a seemingly intuitive but counterintuitive sport. However, if not taught correctly, bad habits can start to form, which is why I am going to explain each step in detail so I can teach correct form.
Stance
Stance is one of the most important steps in the shot cycle. It is the connection between your body and the ground and it must be solid.
Your stance should be balanced, stable, and repeatable. Start with feet shoulder-width apart, maybe a bit wider if needed, and straddle the line.
You have two options here, and it comes down to personal preference. Either both of your feet are gonna be perpendicular to the line, or your front foot is going to be slightly tilted to the side, where the rear foot is still going to be perpendicular.
Figures 6 and 7, created by myself. Simple diagrams for the optimal stance procedure.


Nock
This is a relatively simple step. All you have to do here is set your arrow on your nocking point.
For recurve archers the nocking point will be a brass ring, and under the brass circular ring, you will nock your arrow and make it sit evenly on your arrow rest.
For compound archers it is slightly different. Nock your arrow onto the area between the ties of your D-Loop, and then rest it in the center of your arrow rest. Again, a very simple but crucial part of the process.
Hook and Grip
Hook and Grip is another pretty important part of your shot process, but it differs from recurve to compound.
Compound Hook and Grip
The way that this is set up is in two steps. Firstly, grip your bow with the proper grip form, and then hook your release on the D-loop.
The proper grip form can be remembered relatively easily. High five your grip area, and then wrap the rest of your fingers onto the grip. The thing is that you should NOT grip it too tight as this will cause unnecessary torque induced in the bow, but do not keep it too loose either.
Another thing to think about is not having too much of the weight of your hand on one side of the grip, or the other side of the grip, as this will induce further torque into the bow.
As for the hook part, all you need to do is hook your release with its hooking mechanism and make sure it is secure.
Recurve Hook and Grip
While the grip method is the same for recurve (read above, Section 3a - 3i), there is a different method when it comes to hooking your fingers on the string, because recurve bows do not use a manual release aid.
There are two ways to shoot these recurves, those being with fingers and with a finger tab, and you usually use your fingers when the poundage is light or when you’re just starting out and haven’t been introduced to such advanced equipment.
As for fingers, put 2 fingers on the bottom of the nocking point where your arrow is, and one finger above (you can tell where to put them by looking at the location relative to the brass ring)
As for finger tabs, it's the same principle, but on the bottom of them your fingers are not split(they are together wrapped in the fabric), so put the bottom of the finger tab on the bottom of the nocking point and the top of the finger tab (where its just a singular finger) on the top of the nocking point.
Set
The set position is a pretty simple topic. All you need to do is make sure everything in the previous steps has been done correctly, and then get ready to put your bow in the air for the further steps. This differs person to person, but the idea is to not mess up your previous steps while you are getting ready to pull your bow back.
Set-Up
The Set-Up phase is where the shot starts to truly begin. After establishing your stance, nocking the arrow, and setting your grip/hook correctly, you raise the bow arm into position and begin the more physical motion of the shot. Your goal in this step is to raise the bow and prepare your alignment without disturbing any of the previous form steps.
Compound Set-Up
Raise your bow arm straight toward the target, keeping your shoulders low and relaxed. If your shoulders are tense, it will lead to a poorly set up shot, and your release hand should be hooked on your release and ready to start working on the trigger. Be mindful not to “chicken wing” your draw elbow. Keep it down and relaxed as you prepare to draw. Your draw arm should move in a straight path backward, not up or out to the side, which could add unnecessary torque.
Recurve Set-Up
This is pretty similar to compound. Lift the bow in a controlled motion until it’s aimed slightly above the target. Your draw hand should move with your bow hand at the same time, maintaining tension through your back and shoulders. Don’t allow the shoulder on your bow arm to rise as this is a common error that leads to inconsistent height and alignment, and will lead to less accuracy on the target.
Draw
The Draw is where the arrow is brought to full power. This step is about pulling the string (or release) back smoothly and consistently while maintaining correct alignment and posture. It might seem simple, but how you draw determines how consistent and accurate your shot will be.
Pull the string or release back in one fluid motion, using your back and shoulder muscles, not just your arm. Keep your elbow level with the arrow and once you are finished drawing, do not let your elbow move (until transfer to hold) and keep it behind you in a straight and strong position. Don’t let your elbow move forward or misalign. Also, you must maintain a strong front arm and ensure your head stays still and your eyes locked on the target, which sets up your mental game.
Anchor
While anchor points differ from archer to archer, once you are at full draw, you should have a consistent and repeatable anchor point. Variations in this will most definitely cause variations in your shot process so it is imperative that this does not occur.
Transfer to Hold
This is a largely overlooked step, and I think that it’s also one of the most important ones. Transferring to hold means that you transfer the weight of the bow from the muscles in your arms to the muscles located in your shoulders and your back. This is done through moving the elbow a bit further than the aligned position. You can think of it as squeezing a ball between your shoulderblades located on your back, and you move your elbow inwards towards your shoulder.
This sets up success for your shot because you essentially lock your shoulders in place and prepare for expansion as your elbow moves backwards.
This step is also universal between compound and recurve forms.
Expand/Aim
This is an overlooked aspect as well, because many people put their dot/pin in the middle and punch/let go of the trigger due to target panic, among other things.
Expanding is an elaboration on squeezing the tennis ball between your shoulder blades. Push with your hand against the grip of your bow, and pull with the release hand while slowly activating the release
As a thumb release shooter, I would wrap my thumb around and pull rather than squeeze and let it go. This creates the "Surprise Shot” which becomes ingrained in your consciousness and makes for a much more accurate shot than punching.
While punching may give you temporary accuracy, a surprise shot will always be the correct way to shoot a bow.
However, in extremely windy conditions, it’s okay to punch. This is because you need to focus more on where your dot is going rather than letting it float in the middle, due to the wind pushing you around. Shot timing is crucial here due to these external factors. Another reason it would be okay to punch is if you have very little time to shoot an arrow in a tournament, and other extenuating factors.
However, you should avoid it unless you absolutely have to.
The same goes for recurve, except you're not pressing on anything, you’re just pulling until the clicker goes off, and if tuned correctly, your bow will fire the instant the clicker goes off because you maintained a correct surprise shot.
Release/Follow Through
Once you release, you need to follow through. Otherwise you risk things like dropping your bow arm and making the shot go low. You do this naturally if you make a good surprise shot, because the pushing force against the bow and pulling force on your release hand will counteract the force of gravity just enough to where your bow will leap forward and your hand will go back gently, with your wrist straight.
It’s important to have a clean follow through, because the least amount of movement in your form, is the most amount of accuracy on the target.
This goes for both compound and recurve. Your follow through should NOT be explosive. It should be calm and collected, and you develop your own sense of form.
Feedback
Arguably the most important part of the shot process, you need to give yourself feedback.
“What did I do wrong that shot?”
“How could I have improved that?”
“Did I run through my mental process for that shot?”
These are the types of questions that you should be giving yourself because feedback will foster improvement, therefore leading to a better shot and training experience overall.
04. Equipment and Tuning Basics
You don’t need a very expensive, professional bow setup to shoot well or competitively. What you do need, however, is a bow that fits you, and that you can be consistent with. Archery is a sport that rewards consistency, in many more ways than one, and while form is undoubtedly the most important aspect of archery, a consistent shooting bow will only amplify your success.
Both compound bows and recurve bows have different tuning strategies for creating tighter groups, higher accuracy, and less variation.
Compound Bow Equipment:
Compound Bow
Release Aid
Arrow Rest
Sight with scope/lens/fixed pins
Stabilizers & Dampeners
Arrows (Correct Spine/Length)
Recurve Bow Equipment:
Riser & Limbs
Plunger
Arrows Rest
Sight + Clicker (Optional)
Stabilizers & Dampeners
Arrows (Correct Spine/Length)
It’s apparent that Compound and Recurve share many generic parallels, however, they are fundamentally different when it comes to specific needs and form.
Tuning Basics (Compound):
Paper Tuning:
Paper Tuning is one of the most important types of compound tuning, because it shows the way your arrows fly through the air, and there is an ideal tear that you should strive for. Paper tuning will give you better grouping, consistent arrow flight, and higher accuracy, if executed correctly. Sometimes, however, even paper doesn’t tell the full story. All you have to do to complete this exercise is to essentially shoot your bow with your arrow setup through paper and tune it until it looks like a bullet hole. This graphic will elaborate.

Figure 1: The different types of Paper Tears
Source: Huntnhouse Archery Center, Reno, Nevada.
Retrieved from https://huntnhouse.com/products/service-paper-tune
As you can see, the different kinds of tears that your arrow makes in the paper, the different kinds of adjustments you will need to make, and so on and so forth.
Arrow Spine & Point Weight Matching:
Obviously, paper tuning is pretty much worthless if you aren’t using the right arrow, because then your bow will be calibrated to the wrong kind of arrow for your specific setup. There are two key concepts to understand here. Spine and point weight, and how they interchange with each other.
Spine is defined as the numerical value of how stiff your arrow shaft is, also known as the deflection rate. This is because arrows do not fly in a straight line (Due to things like the Archer’s Paradox and Gravity influencing the flight among other internal variables). Conventionally, the higher the number, the less stiff the arrow shaft will be. For example, a person pulling 40 pounds as their poundage out of a compound bow would be shooting somewhere around 500 spine depending on the type of arrow. Someone shooting 60 pounds would be shooting around 380 spine.

Figure 2: A chart that shows the spine that you should be shooting based on several factors.
Source: Easton Archery
Retrieved from https://eastonarchery.com/group-i/
Point weight, also referred to as tip weight, is how heavy the point of your arrow is. This value is almost always measured in Grains (gn). Point weights range from as low as 50 grains to over 200, and this depends on the arrow. But the way that point weight is associated with Spine is that the lower the point weight, the stiffer the arrow, and the higher the point weight, the weaker the arrow. So if I had a 400 spine arrow and a 200 grain point, the actual spine would be more than 400, because the weight of the point itself is influencing that.
Cam Timing:
Every single modern compound bow has these two wheels on the bottom and the top, and they are called cams. They come in many different shapes and sizes depending on the make and model of your bow. At the sides of the cam, there are these things called draw stops, which hit the string and limit your draw length to where it is set to be once you are at full draw. However, sometimes bows will go out of time. This could be due to a multitude of reasons, but usually, it’s due to your strings and cables stretching over time, which can’t really be prevented. This can also make your bow feel worse to shoot and be less accurate overall.
To set your cam timing, you need to use a draw board, which is a tool that draws your bow back without you doing it while the bow is laying down so that it’s easy to work on at full draw. Then, check the timing. If the draw stops on the top cam are hitting the string before the draw stops on the bottom cam are, your timing is off, or vice versa. However if the draw stops are hitting the string at the same time, your timing is good to go. If not, twist the cable connected to the cam that hits the draw stop first. You can make half or full twists to adjust the timing until it is perfect.
Tuning Basics (Recurve):
Plunger & Center Shot Tuning:
While compound bows rely heavily on mechanical tuning (cams, modules, etc), recurve bows are more about micro-adjustments to your arrows, limbs, and other factors.
The plunger is one of the most important tuning tools on a recurve setup. It sits near the arrow rest and helps cushion the arrows flex as it leaves the bow, sort of like a dampener for arrows.
Most advanced plungers are able to adjust their tension. Softer settings allow more flex, whereas stiffer settings resist it, and most archers start off somewhere in between. This can be tuned, however. You can adjust the plunger and fine tune it based on the group spread as well as the arrow flight. However there is no set “best” setting, you need to experiment with the different settings and see which ones give you the best results, as you have to do for most bow tuning related things.
Brace Height Adjustment:
The brace height is the distance between the string and the deepest part of the grip, also known as the pivot point of the riser. This affects how long the arrow stays on the string and impacts vibration, noise, and to a greater extent, accuracy.
You can adjust the brace height yourself by twisting it, to both increase and decrease brace height. It depends on the direction that you twist it.
The way that you test this is with a brace height measuring tool, which looks like a T. You can also look for string noise, feel for hand shock, and watch for clean arrow flight. These three factors are influenced heavily by your brace height.
The goal is to find the sweet spot that you personally like where the bow feels smooth, sounds quieter, and shoots consistently.
Clicker Tuning:
On an Olympic recurve bow, a clicker is used to ensure that the draw length stays consistent shot to shot, because there are no draw stops on a recurve bow. It acts like a mechanical release for a recurve archer because when the arrow is drawn back to the exact same length every time, the clicker clicks, which tells you to shoot,
Tuning the clicker involves making sure that the arrow length is long enough for the clicker to clear it only when you’ve reached your full draw position. Another thing that you can do is adjust the angle of the clicker blade so that it rides comfortably along the arrow without too much side pressure (which may cause variation). Obviously, practicing with it until the timing feels natural to you is important so that it doesn’t interrupt your shot process and shot rhythm.
Ultimately, tuning your bow, whether compound or recurve, is a process of trial, observation, and adjustment. There is no one-size-fits-all answer, which is what makes it interesting. You should learn how your bow reacts to changes, and trust the feedback from your groups and the feel of your shot.
05. Mental Game & Practice Habits
It is commonly known that archery is indeed a mental game. The mental game for archers does not differ between compound and recurve at all, because it’s not form or bow related. The reason that people talk about the mental game so much is because it is the single most important aspect, along with your form, of archery. It also can improve your form and your self confidence.
Nevertheless, the mental game of archery is a vast and broad topic with many areas of study. I cannot possibly cover every single aspect of the mental game because aspects also differ from person to person. So I am going to be talking about the three biggest aspects in your mind that you can improve, those being:
Calming nerves and Recentering yourself in a tournament
Self Talk and using it to have discipline in your shot process
Positive Affirmations to improve your self confidence.
Calming nerves and Recentering yourself in a tournament
In a tournament, there will always be nerves. No matter what, you will have them. Even if you think that you aren’t nervous, there is always an underlying sense of dread when you pull back that first scoring arrow of yours. It’s just a natural human response to pressure, and every archer has it. However, if nerves pile up, it can cause you to be more focused about your score than your form and how you feel whilst you’re shooting, and that’s actually going to cause you to shoot worse, because you’re self inflicting damage on yourself.
So to calm nerves, you need to focus on one shot at a time. Don’t worry about your score that keeps getting added to, just focus on running your shot process and making a good feeling shot, every single time. That is more important because it tells you to stay in the moment rather than thinking about a past arrow or a future arrow that might be bad.
Self Talk and using it to have discipline in your shot process
Self talk is something that a lot of archers overlook, but it's one of the most effective tools that you have in your toolbox of mental game techniques. Not everything has to be external, because sometimes, what you say to yourself inside your own mind can make or break your shot process. Your brain controls your body, and if you let your brain wander, your body will follow. You can’t expect your form to be locked in if your thoughts aren’t.
Good self-talk is not about hyping yourself up like in a movie, it's about running the same words, mantras, or phrases through your head that keep you disciplined and remind you what to do next.
Personally, I run phrases like “I’m going to do this right” and “Keep pulling”, along with “I’m going to shoot this shot absolutely perfectly, or I am not going to shoot it at all.”
Another thing that I do is that I use mental cues and self talk to remind myself to do my process, and you can do this too. This is like “Wrap” when I am at my anchor point (see the form section) and I need to wrap my thumb around the button of my release to begin my expansion and transfer to hold portion of my process.
These short phrases act like anchors for you. When nerves are high, or when I’m getting frustrated, these are what bring me back. You can and should use them for every single arrow you shoot, whatever works for you. What matters is that they keep you grounded in your process, not in your feelings, because if you think more about your feelings you’ll start to distract your brain from actually doing archery.
Positive Affirmations to improve your self confidence
This mental technique engrains your brain into being more confident in your shooting ability. Confidence is a key part of archery because having low self esteem means that you won’t be able to believe in yourself, and believing in yourself is something that archery requires for being and staying competitive at the highest level.
Take a piece of paper or a sticky note. A sticky note works best for this. What you need to do is write 5 positive affirmations, things like “I’m a great archer” and “I have confidence in my ability to make a good shot.” Then you have to place it somewhere on your wall, maybe write it on your mirror with a dry erase sharpie. It needs to be somewhere where you can see it every day, multiple times a day. The more you read these, the more confident you will become and it will help you improve your shot process. I recommend all archers, from beginners to advanced shooters, to do this exercise. Archers have done this at the national level, and their self confidence also grew in other aspects of their life, such as their school.
06. Weekly Sample Training Plan
This is a sample training plan that you may want to implement, and this can be done with both an online tracker and on your notebook. For the purposes of this document I will be sharing a format for a potential online tracker, but you should keep track of your progress, your personal bests, and in general a training plan on how to improve your skills of archery while being consistent in practice.
In a physical notebook, it would look something like this
Name & Date
Arrow Count of the session
Score
Feedback/What to improve on
The feedback section is probably the most important part since you can just work on that at a certain point. However I personally prefer to use an online training plan because of its ease of use and accessibility along with having a greater sense of organization. I made this using Notion but you can use spreadsheets/docs whatever works for you as the archer.

Again, you can use whatever you like.
07. How to Compete
Equipment Check
Competing in archery tournaments is where all your training comes together. Whether it's your first local tournament or a national championship, proper preparation separates successful archers from those who struggle under pressure. This section will guide you through everything you need to know about tournament preparation, what to bring, and how to perform when it matters most. For the purposes of this guide, I will be explaining the rules of Target Archery tournaments as that is the prominent format of said archery tournaments.
Your bow should be tournament-ready well before competition day. Check your equipment and your setup fully a week or so prior to your tournament. Check your string and cables for fraying, ensure your nocking point hasn't moved, and verify that your sight hasn't shifted. In fact, I would recommend locking your sight during your travel so that nothing moves it in general, but remember to unlock it when you start shooting because sight adjustments are necessary for success. For compound shooters, test your release aid thoroughly and make sure your peep sight alignment is perfect. A twisting peep is a very annoying and common occurrence. Recurve archers should verify their clicker timing and plunger tension for the most optimal accuracy.
Physical Preparation
Tournament days are long and physically demanding. A typical tournament can involve shooting 70+ arrows over several hours, often in varying weather conditions. Build your endurance gradually in the weeks leading up to competition. Practice shooting full tournament rounds (36, 72, or 144 arrows depending on your division) to condition your muscles and mind for the sustained effort required.
Running and consistent exercise can and will help you improve your strength and focus, and stamina, which are all key for archery.
Focus on maintaining good form even when fatigued. The last few arrows of a tournament are often where medals are won or lost, and fatigue-induced form breakdown is one of the biggest culprits for poor finishes. Finishing strong requires exertion of both physical and especially mental strength.
Preparation of Necessary Items
I will now list every single necessity for both compound and recurve archers, along with individualized components for all of them, and this is going to be for a larger tournament such as outdoor nationals. However, if you have necessities that are not on a list or are not bringing something that you feel is too excessive, then it is up to your discretion. These are just things I and many other archers tend to advocate for.
For All Archers:
Bow (obviously)
Arrows (Bring at least 12 but ideally more)
Armguard/Chest guard if you use one
Finger tab or release aid (plus backup)
Allen wrenches
Pliers
Spare nocks (at least 6)
Arrow puller/gripper (Very important, since some tournaments use new bales)
Towel for cleaning arrows and equipment (Should be hooked on your quiver)
Compound-Specific:
Backup release aid
D-loop material and serving
Portable Bow press (if traveling far from pro shop, however this is excessive)
Recurve-Specific:
Extra finger tabs
Bow stringer
Spare plunger and springs
Spare string if you have one
Spare clicker
Personal Necessities:
Folding chair (many venues don't provide seating for parents)
Canopy or umbrella for weather protection
Cooler with ice packs for hot weather
Water bottles (stay hydrated)
Snacks (avoid sugar crashes as they will make you shake more, along with caffeinated beverages)
Sunscreen/hat
Rain gear
Plastic bags to protect equipment from moisture
Tournament schedule and scorecard
Cash for entry fees, food, parking, and archery equipment vendors.
Competition format
While there are many varying indoor target competition formats, the main outdoor target competition is like so:
Qualification: 72 arrow scoring rounds/144 arrow scoring rounds depending on the tournament. These are shot in ends of 6 arrows. This also determines your seeding for the elimination rounds.
Elimination Rounds: Head-to-head competition where archers shoot sets of 3 arrows. For compound, it's the score of 3 arrows over 5 ends, for a total of 150 points. For recurve shooters, it’s based on end-to-end set points, with 6 points being a winning score (each end gives two points).
Team Rounds: High stakes, fast-paced archery rounds with 2 or 3 archers (conventionally 3) per round. The score is out of 240 over 4 rounds of 6 arrows total, 2 shot by each archer (3 if the team is composed of just 2 people), with just 120 seconds to shoot all arrows per round in total.
Tournament Etiquette
Respect the shooting line and wait for the proper signals
Help score other archers' arrows accurately and honestly
Keep noise to a minimum during shooting
Do not speak on the shooting line
Congratulate opponents regardless of outcome
Follow range commands immediately and without question
08. Conclusion
Archery is a journey that rewards patience, consistency, and deliberate practice. Throughout this guide, we've covered the fundamental building blocks that separate casual shooters from competitive archers: understanding your equipment, mastering proper form, developing mental resilience, and preparing for tournament success.
As you continue your archery journey, stay curious and remain coachable. Even Olympic champions work with coaches, more so than you might expect, and continually refine their technique. The moment you stop learning is the moment you stop improving, and you need to believe in yourself.
Whether your goals are recreational enjoyment, local competition success, or national-level achievement, the fundamentals in this guide provide your foundation. Build upon them with patience, practice with purpose, and compete with confidence.
From all of us at Arjun Archery Academy, we wish you the best in your archery journey.
Comments
Post a Comment